June 29, 2012

Saddest Potato Harvest Ever

Lesson learned: potatoes don't do well in partial shade. Ten small Yukon Golds, three squirrel-buried pine cones, and one large river rock. That's what I dug out of two potato mounds in the side yard yesterday that ideally would have yielded more like 80 potatoes under optimal conditions.

Potatoes and other potato bed treasures

To be fair, these weren't optimal conditions, and this potato planting was a bit of an experiment in the first place. Most of my seed potatoes went into a raised bed in the front yard and a series of potato towers in the backyard in March. This location became available in early April when we moved a bunch of old logs from the side yard to make a hugelkultur bed and were left with a big pile of light, loose soil consisting mostly of decomposed wood and leaves. I still had a handful of potatoes to plant and it looked like a great place to dig some trenches, because potatoes grow well in loose soil high in organic matter, and also because the large open area and soft soil would make for easy harvesting.

The only potential problem was the shade. I wasn't sure how much light the area would get, but I decided to throw some potatoes in there anyway and see what happened. What happened was there was definitely not enough sun, as you can see by the spindly stems of the resulting potato plants:

Leggy potato plants

I'm wondering if light wasn't the only problem, though; perhaps the squirrels uncovered and ate a few potatoes in the course of burying their pine tree booty? I don't know enough about squirrel diets to know if that's a possibility. And I'm not sure how I missed such a big rock when I planted the potato pieces in the first place, but I wasn't surprised when the digging fork hit it, given how much river rock was scattered throughout the yard by the prior owners.

The good news is that the potatoes I did get were super tasty, with a perfect, dry fluffy texture. I had some of them for dinner with a pat of butter and a sausage from the Co-op. The other good news is that the late-crop German Butterballs I planted in potato towers in the back are looking really healthy, so I have my fingers crossed those will produce a nice batch of spuds.

Next year, I'll go back to planting potatoes in a full-sun location and save this side yard plot for an edible that can tolerate partial shade--anybody got any ideas for what that might be?

June 28, 2012

Stoplight Watering System

Having a large summer garden and coop full of chickens can make it hard to go on an extended summer vacation, or even a short one, for that matter. I got lucky recently when a very capable and responsible friend agreed to watch over the homestead while we were up in Washington for two weeks earlier this month. Not only did I not worry at all, but I barely thought about the food or animals while we were away.

Most of the garden is being watered by hand right now, and that definitely complicates things when asking someone else to help. My friend doesn't keep a big garden herself, so it was especially important to provide good guidance on watering. One of the things I did to prepare for my absence was create a stoplight system of green, yellow and red tags to hopefully simplify the watering process.

Stoplight watering system tags

Last summer I bought plastic dressing room tags from a retail supply place to help me keep track of how often I was watering my fruits and veggies. (In my system, the numbers on the tags stood for days of the week instead of pieces of clothing; one was Monday, two was Tuesday, etc. and I hung them on plant cages to indicate the last time I watered.) The tags came in a bulk package, so I had plenty leftover to make a stoplight system without putting a dent in the supply. It was as easy as buying three cans of cheap spray paint.

Supplies: tags, newspaper & paint

Red tags after the first coat (I gave them two)

Once they were dry, I placed the tags on my plants as follows: green for plants that need lots of water, such as cucumbers, summer and winter squash, basil and flowers in clay pots; yellow for plants that need moderate amounts of water, including melons, peppers, eggplant, corn and beans; and red for plants that need occasional water, such as tomatoes, and also for plants I didn't want watered at all, such as the apple trees I'd deep watered before leaving and potatoes that were curing in the ground.

Winter squash with a green tag for heavy water

Peppers with a yellow tag for moderate water

Tomatoes got a red tag

The idea was if you see green go ahead and water, if you see yellow hold back a little, and if you see red you know to water a lot less often or not at all. A written information sheet provided additional detail.

Except for the tomatoes, which had blossom end rot caused by my own inconsistent watering back in May, everything looked fantastic when I returned. My friend said that the colored tags worked well in combination with the written information to help her remember what needed to be watered when.

Someday Mr. English and I will get around to re-doing the irrigation system in the old beds and installing new hoses in the new beds, but for now I'm actually enjoying the hand watering. It forces me to slow down and gives me a chance to really examine each plant for pests, fruits, etc. as I'm watering. If we go away again before that new irrigation is in place, I'll definitely use these tags again.

June 27, 2012

Watermelon Guessing Game: How to Tell if a Watermelon is Ripe

There's nothing worse than watching a watermelon grow to size for weeks on the vine and then cracking it open only to find it's not quite edible. Last year I played and lost the watermelon harvest guessing game so many times I almost decided not to grow them this year, but I didn't want to give up after just one season. I put them in my summer garden again, and I'm glad I did!

New Queen yellow watermelon

Watermelons are notoriously difficult to harvest, and sit at peak ripeness for only a day or two. They do not continue to ripen once cut from the vine, so the ideal harvest window is very small. Researching this online, I've found lists of more than ten factors to consider when trying to figure out whether a watermelon is ready. Some advice is ridiculously unclear, as in the following from gardenweb: "Thump it. If the watermelon sounds hollow (if you hear a dull thump/thud), the melon is usually ripe. The unripe melon will have a tighter, metallic ringing or hollow sound." Huh?

Looking ready to pick, but is it? (No!)

Having learned through trial and error last summer, I now look at just three factors as I attempt to avoid splitting open a pale, under-ripe melon:
  • weight
  • tendril
  • leaf

First, I look for a watermelon that is heavy for its size. Watermelons are made mostly of water (duh!) and water is heavy. I evaluated this watermelon for weight before cutting it, and then used the scale to find out it weighed 5.5 pounds, which is in the correct range for this variety.

This one weighed in at about 5 1/2 pounds

The second factor I take into account is the status of the curly tendril closest to the stem of the developing fruit. In the first picture below, taken two weeks ago, the tendril is still green, a sign the melon isn't ripe. In the second picture, the dry tendril is an indication the melon is ripe.

Green, flexible tendril indicates an unripe melon

Brown, dry tendril indicates a ripe melon

The last thing I look at is the tiny leaf closest to the stem of the developing melon, called a "spoon" leaf for its shape. A green leaf is a sign the watermelon is still developing; a dry leaf is an indication the melon is ripe. Sometimes you might not find a leaf at all, which probably means it has dried and fallen off the stem.

"Spoon leaf" is still green and attached to the plant

There are three factors I don't pay attention to in this guessing game. One is sound, something experienced farmers supposedly use to determine ripeness: if the watermelon makes a tinny, metallic sound upon tapping it in the morning, it's not ready, but if it makes a dull, thumping sound, it's ready. I tried this multiple times last summer and when I thought I could tell the difference, I was wrong.

I also found size not to be a trustworthy indicator of harvest readiness. Last year we grew Sugar Baby melons and those were supposed to be small, like these New Queens. One grew to almost twice the expected size, so I thought for sure it was ripe--nope.

Finally, I disregard the color of the underside of the melon. Everything I read says a ripe watermelon has a yellow underside, and that an unripe one has a pale green or white underside. My experience has been almost the opposite. The first picture below shows my watermelon two weeks ago with a prominently yellow underside. The second picture was taken at harvest, by which time the color had paled.

Two weeks ago, yellow underside indicates ripening

At harvest, melon has a pale yellow underside

I'm happy to report that I did in fact win the guessing game with the watermelon pictured in this post. I cut it from the vine (no pulling, the way you harvest other types of melons), split it open and was delighted at the bright yellow color, rich flavor, and crisp texture. I probably could have cut it a day or two earlier, but it's hard to tell. It tasted great to me.

Half a New Queen watermelon

Bowl of sweet melon slices

I leave a little extra on the rind for the chickens

Score so far: unripe/overripe melons: 0, me: 1. Have you ever tried growing watermelons in your garden? Got any secrets for harvesting at peak flavor?

June 25, 2012

Garden Fail: Blossom End Rot

And now the answer to the question, "Why do you plant so many tomatoes, Saskia?" Because I know that a percentage of them will be affected by problems such as blossom end rot--pictured below--pests, leaf roll, cool weather and other issues that might reduce my harvest. And since one can never have too many fresh tomatoes in the summer, I plant loads of them. In the event of a totally problem-free season (hasn't happened yet), I will enjoy preserving the bumper crop.

Striped Roman tomato suffering from blossom end rot

The extra plants are a kind of insurance, and it turns out the insurance will be important this year. As of this morning, almost every one of the twenty plus tomato plants in my yard was filled with half-rotten tomatoes afflicted with blossom end rot. I pulled half a bucket full of them from the vines and tossed them in the compost pile.

Blossom end bummer

Blossom end rot is a physiological disease involving calcium deficiency that is caused primarily by fluctuations in soil moisture content. In other words, it's not caused by some outside bacteria, virus or pest, and I could have prevented it with more careful attention to watering. For tomato plants growing directly in the Davis clay soil, a deep watering once every 7-10 days should suffice; I got busy/lazy and let my plants go two weeks without water at least twice in May, so I guess I kind of asked for this!

In my experience, blossom end rot happens more often toward the beginning of the season (now), and it happens more with certain varieties than others (Roma types, for example). I'm sure there are products on the market designed to combat this problem, but I know it will resolve itself as the season progresses, as long as I do a better job of monitoring my watering.

Because blossom end rot starts at the base of the tomato, you might not notice it as the tomatoes are developing. For example, these tomatoes look perfectly happy from where I'm standing, above them:

Pretty looking tomatoes

But flip them up and you get a nasty surprise: the entire base is rotten:

Extreme blossom end rot

A few years ago I might have sat down on the grass and shed a tear or two at this development, as disappointing as it is, but now I understand that being a farmer means enduring failures like these on a regular basis (except I bet real tomato farmers don't deal with this particular type of failure very often, as they have enough experience to know how to prevent it.) After picking all the rotten fruit off the plants this afternoon, I stopped to give thanks for the unaffected fruit that was still hanging on the branches and for the loads of ripe cherry tomatoes, none of which were affected for some reason. I also resolved to be more consistent about watering.

Super Sweet 100 cherry tomatoes

To help alleviate the disappointment, I picked a bouquet of Becky Daisies for the dining room table. They are so beautiful, it's as if the garden is saying, "Hey, don't worry about it! Enjoy these gorgeous flowers instead." 

A vase full of happiness

How do your tomatoes look this year? Is blossom end rot a minor issue for you, or have you dealt with entire plants full of ugly-bottomed fruit? Or are you all much more disciplined than I am about watering and therefore don't have this problem? (On second thought, if that describes you, I don't want to know about it!)

June 21, 2012

Skagit Valley Inspiration

We've been vacationing with family up in the Puget Sound this week. There are lots of things to love about this part of the country, but I was especially struck yesterday by the many small, family farms in the area that offer a wide variety of beautiful produce and appear to be thriving.

The barn at Pleasant Ridge Farm near Mt. Vernon

I've been coming up to this part of Washington for over twenty years and if you'd asked me in the past, I would have been able to tell you it was ag country, but I never quite appreciated the agricultural abundance the way I've found I do this year. It was fun yesterday identifying crops as we drove down the country roads, and we enjoyed stopping at a number of farm stands to chat with the farmers and pick out some fresh produce and specialty items, like farm-made bread & butter pickles and wildflower honey.

Bushels of dry beans at Pleasant Ridge Farm

My favorite spot by far was Pleasant Ridge Farm near Mt. Vernon. It was picturesque and there were two refrigerators full of tasty farm treats, plus bushels and bushels of good-looking fresh food to choose from, but it was the method of payment that stopped me in my tracks: the honor system.

Honor system explanation and plea for customer honesty

They must exist in California too, but the last time I encountered a pay-on-the-honor-system farm stand was 20+ years ago in a tiny town in Oregon, and that was just for flowers. Pleasant Ridge Farm was selling $7 gallons of apple cider, $5 glass jars of sauerkraut, packages of popcorn and soup beans, plus tons of fresh fruits and vegetables. In other words, there was a lot of merchandise in the shop to be running it purely on the honor system. The fact that it works makes me feel positive about humankind and gives me hope for the future.

Farmer out on his tractor as customers shop in the barn

Putting money in the locked cash box

We left the farm with an armload of potatoes, onions and asparagus, which we enjoyed later for dinner, plus a jar of pickles, a bag of popcorn, and a couple of bottles of apple cider for the car ride home. It reminded me a bit of our autumn excursions to Apple Hill, where there are similar opportunities to see a number of small family farms within a few miles of each other and buy just-picked veggies & fruit directly from the farmers. It was also a good reminder that I ought to seek out such opportunities closer to home more often.

June 18, 2012

Oodles of Summer Squash

There are lots of factors involved in deciding how much summer squash to put in the ground each spring: productivity of the varieties you're planting; growing conditions in your yard; likelihood of pests attacking some of your plants; how much squash your family likes to eat (or how much you can sneak into your recipes without them knowing it!); whether you're planning to preserve any of it or eat it all fresh; and whether your neighbors will bring over a harvest basket or quickly run the other direction when you announce you have squash to share.

Morning squash harvest

Last year, I ignored all of those factors and planted summer squash as an afterthought at the end of May. Both plants looked ugly from the start and died before producing anything edible. By then it was too late to replant, so we ate very little squash.

This year, I think I overcompensated for last year's failure. Out of fear of a repeat, I started an abundance of squash seed in the greenhouse in March, and all of it took. After giving away some of the starts, I put six plants in a front yard bed, started three in large terra cotta pots in the backyard, and tucked two more under a Crepe Myrtle near the greenhouse, just in case. The homestead has been overflowing with squash for at least a month. The only saving grace is that I chose four different varieties and have been picking them very young, so it hasn't gotten out of hand yet.

Piccolo

My favorite variety in terms of looks has been the Piccolo squash, which resembles a miniature watermelon. I've learned these need to be picked when they're no more than tennis ball size; leave them on the plant much longer and they develop a strong taste and an interior filled with large seeds.

Another new variety for me this year is Patio Star, which has been bred to do well in a container. The jury's still out on this one. For one thing, in our Davis heat the pots need to be watered almost every day by hand, and that's a pain. Also, fertilization of the flowers has been spotty, with about half the tiny zucchini shriveling up and falling off the bush instead of developing into edible veggies. There are lots of flowers, though, so maybe it will prove worthwhile in the end.

Patio Star (meant to be grown in a pot)

I haven't grown yellow squash in a few years, so I also chose to plant a few Early Prolific Yellow Squash. They are, in fact, both early and prolific, and the blend of yellow and green squash is pretty in the kitchen.

Early Prolific Yellow Squash

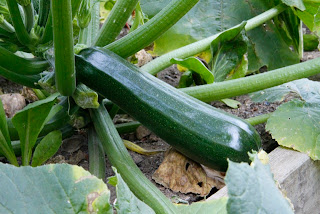
And I can't leave out the old standby, Black Beauty zucchini. I've grown this variety for years. The only drawback I've found is that you've got to check it daily, or you'll have a baseball-sized zuke before you know it. When that happens, I usually just pluck it off the vine and toss it to the chickens.

Black Beauty

I've enjoyed the new varieties this summer, but there are so many fun squash varieties to choose from that I think I'll pick a couple of different ones next year (while keeping Black Beauty). Any reader favorites? Leave a comment with the variety and the seed house if you know it. In the meantime, I'm off to make my next batch of zucchini nut muffins.

June 15, 2012

Green Radicchio?

Unless I'm totally losing it, the green plant pictured below is a variety of radicchio called Palla Rossa Special that I purchased from Territorial Seed Company in January, seeded in the greenhouse in February, and transplanted into my raised beds in early March. Radicchio...you know, the slightly bitter, European "green" that makes a fine addition to salad and is red, not green.

Radicchio, I think

I'm having a hard time imagining how that full, green plant which seems fairly close to maturity (and if the maturity date on the seed packet is any indication, should be mere days from harvest time) will shortly turn into this...

(Photo courtesy Territorial Seed)

Given the color, I started to wonder if I planted it at the wrong time of year, but I checked the Territorial website and it says this variety is "unique, as it can be planted for both summer and fall harvest."

So, I'm going to be patient and trust that this is just another one of those plants that does not at all conform to the stated growing length, and keep my fingers crossed that it will magically transform into a tight, burgundy-colored head in the next few weeks.

June 14, 2012

Well, that Stinks!

The bok choy bug of Monday's blog post has been identified. Thanks to some help from the facebook community, my nature-loving mother-in-law and her trusty insect field guide, and an Internet search with Mr. English to confirm it, we've identified our beautiful insect. Unfortunately, the news is not good: it's a harlequin bug nymph.

Harlequin bug nymph

Harlequin bugs (Murgantia histrionica) are a type of stink bug that will damage plants by piercing leaves and sucking the nutrients out of them. They primarily attack brassicas and other leafy crops, so it makes sense I found them on my bok choy.

I've seen adult harlequin bugs in the yard before and I know they're pests, but the nymphs look just different enough that I didn't make the connection. At least to my eye, the teenagers seem to have much rounder and plumper bodies than their adult counterparts, which seem longer and thinner with legs that stick out more.

It's too bad something so pretty is unwelcome in the garden. I don't know if I can bring myself to "control" them...maybe I'll have to plant some extra bok choy next year just for the harlequins.

And FYI: next time I encounter a UFI (unidentified flying insect) in the yard, I'm going to check the What's That Bug? website first. While it's still tricky to identify a bug if you don't know where to start (now I understand why my students always got frustrated when I told them to look up a word they didn't know how to spell in the dictionary!), this site is a great resource. If you can't figure it out on your own, you can submit a photograph and some information and ask The Bugman, who operates the site, to identify it for you.

June 13, 2012

DIY Outdoor Sink: Rinse Veggies, Save Water

Last month, my handy husband put together an outdoor sink for the homestead using an old stainless steel double basin our neighbors were throwing away, plus some 2 x 2s and a few small items purchased at Hibbert Lumber.

My new outdoor, water-saving, veggie prep station!

I'd been wanting an outdoor sink for a long time, but buying a brand new sink and having it professionally plumbed to tap into our drain pipes wasn't financially possible. Then I saw a picture of Harriet Fasenfest's DIY outdoor sink and was inspired. Turns out, I'm happy we didn't spend money on a new, fully-plumbed sink, because not only was mine practically free, but it's also a serious water saving device and functional veggie prep station.

Mr. English filling the rinse basin with just-picked oranges

The parts required to modify the sink to meet our needs were minimal. The sink still had a working faucet attached. I found a four-foot-long drinking water safe hose designed for an RV, and used that to connect the faucet's cold water line to the water spigot. (The faucet's hot water line was capped.) The setup required a couple of other small plumbing parts to connect the standard threading on the hose to the faucet.

Drinking water safe hose, attached to existing Y-connector

Hose connected to the cold water line; hot water line capped

My favorite part about the sink is our setup for collecting and re-using water. Since I'm not putting any soap or nasty chemicals in the sink, all the water used to rinse food, hands or tools can be saved and used again to water the lawn or other landscape plants.

Chard soaking in the rinse basin

Since the original drain line was still in place--cut off at the end of the white elbow in the photo below--it was easy to create this water-saving feature. Mr. English modified a $2 plastic bucket from Home Depot so that it could both collect and dispense water. That involved cutting a circle out of the lid and installing a screen to let water through but keep mosquitoes and debris out, and installing an inexpensive spigot near the bottom. The bucket was placed under the right basin of the sink.

Original sink drain pipe with collection bucket underneath

Spigot attached using a drill and some caulk

Now when I triple rinse a colander full of greens, instead of all those gallons of water going down the kitchen sink drain, they go into the collection bucket and then into a watering can for use in the garden.

Veggie rinse water draining into collection bucket

Rinse water draining into watering can

But wait, there's more! The other reason I love my new sink is that it makes processing fruits and veggies--whether from the garden, farmers market or grocery store--so much easier. While the right side of the sink is used for rinsing, the left side (where the garbage disposal used to be), is where I do the food prep work.

Now instead of making a dirty mess in the kitchen and filling my kitchen compost bucket with tops, roots, damaged leaves, etc. that need to be carted outside, the trimmings fall right through the hole in the sink directly into a large, white bucket. When it gets full, I walk it over to the compost pile. So convenient!

Looking through the trimming sink into the compost bucket

I'm very curious to see how much water will be saved on the homestead by using this sink. Water costs will be increasing in Davis in the near future, as the city looks to build a new system for water delivery. Anything I can do to conserve water will make a difference in our bill, and is just good for the earth, of course. I plan to track the water collection for at least a couple of weeks to get a rough idea of the savings, and will report back. In the meantime, if you're interested in making a similar sink for yourself and want more details (or want to come check it out if you're in the area), let me know!

June 12, 2012

Corn at Four Weeks

It's shocking to me how quickly corn grows. Living in Davis, I watch corn in the fields on the edges of town shoot up from nothing to six feet seemingly overnight.

"Honey & Cream" corn plants

This is the first year I've had it in my own garden, and even though I was aware it grew quickly, just how fast is still a surprise.

Corn plants on May 10th, dwarfed by the lettuce at the back

Same corn exactly one month later

We haven't grown corn in the past because you have to put in at least four rows in order to get enough wind pollination to produce ears, and I never felt like there was enough room for that. (Fewer rows can result in no ears at all, fewer ears, or ears with half the kernels undeveloped.) So I have nothing to compare this year's growth to, in terms of my own gardening experience.

5-6 foot long rows

I'm curious what other people think about this corn growth, because while it seems like the right height to me, Mr. English says it seems shorter than it should be at this stage.

Either way, I have my fingers crossed this experiment will work and we'll get baskets full of fresh corn this year, since they say there's nothing sweeter than an ear picked fresh from the plant and plopped immediately into a pot of boiling water.

Are you growing corn this year?