December 27, 2012

Christmas Cabbage (and Cabbageworms)

On the first day of Christmas my garden gave to me, a cabbage for Caldo Verde.

On December 24th we harvested this beauty from the brassica bed along with some kale, sliced up a chorizo, and transformed it all into a traditional Portugese soup. Because it was a red cabbage, the Caldo Verde turned out more like a Caldo Verde y Rojo, but no matter.

Ruby ball cabbage

Caldo Verde--"green broth" in Portugese--is often made with collard greens, but many people substitute kale. Potatoes are another main ingredient. The soup is commonly served at Portugese celebrations, and given that Mr. English has some Portugese roots, it was a fitting Christmas Eve meal for our family. We served it with roasted garlic and dry jack toasts, for a hearty and filling night-before-Christmas dinner. The next day it made a perfect Christmas Day lunch.

The chickens got a Christmas present as well this week. For reasons I can't understand, given that I haven't seen a live cabbage butterfly in the yard for at least two months, there are still loads of cabbage butterfly worms on my cabbage plants. Those eggs must have a long shelf life! Even with the near-freezing nighttime temperatures we've been having, these worms somehow survive tucked up against the ribs of the cabbage leaves.

Cabbage worm on a cabbage leaf in late December

I collected a nice handful for the chickens, who are always eager to snap them up. The chickens have been confined to their run more than usual lately with all the downpours we've had, and they haven't had much foraging time, so I'm sure they really enjoyed the "verme verde".

Chicken snacks

Yum!

It's quiet in the garden this time of year. That's a good thing, not only because the rain makes me want to stay inside with a cuppa hot cocoa and a bowl of buttered popcorn, but also because I started working part-time in the classroom last month. I haven't had as much time to work in the yard (or write about it!) as I get a handle on my new responsibilities and get to know my students. By the time I'm really settled in next month, it will be perfect timing to think about starting seeds for next year's veggies.

In the meantime, kale and spinach are ready to harvest as needed, carrots and lettuce are growing slowly, garlic and onions are coming along, red clover is doing its job covering otherwise resting beds and providing greens for the chickens, and a bounty of shelling peas are in the forecast for spring. All that means I can take a worry-free break from the garden this week, enjoy time with family and friends, and make plans for the New Year.

Happy holidays, and I hope you're getting some rest this winter season, too!

December 1, 2012

Banyan Café: Curried Butternut Squash & Apple Soup

Butternut squash is plentiful and cheap this month and is the perfect veggie to make into a quick, frugal and cozy soup during this cold, rainy weather. Farmers markets are full of winter squash and if you're in Davis, Nugget Market has organic, local butternut on sale this week for $0.75 per pound. Better yet, you might already have a harvest basket full of butternuts in storage, in which case your main ingredient is free.

Butternut squash from the garden

Growing our own squash (and onions and garlic) means this soup costs us just pennies per serving. The grocery store supplied the chicken stock, cream, butter, celery, apple and spices (under $2 if you portion it out.) Once our newly-planted apple trees start producing, I'll have the apples on hand, too. For stock, I buy organic Better than Bouillon at Costco, which means the 4 cups called for in this recipe cost a total of about 30 cents. The most expensive thing in the soup is the cream, and you can leave that out if you're allergic to dairy or want a lighter soup.

Gather:

1 yellow onion, chopped
2 stalks celery, chopped
2 T butter
1 T curry powder
1 clove garlic, minced
1 two-pound butternut squash, peeled, seeded & cubed (save seeds for roasting)
1 large Granny Smith apple, peeled, cored and chopped
4 to 4 1/2 cups chicken broth
1/2 cup heavy cream
salt and pepper to taste

Put it together:

Melt the butter in a large soup pot on medium heat and saute the onion and celery until soft (don't brown), about 10 minutes. Add curry and garlic and saute for 1-2 more minutes. Add the squash, apples and 4 cups of stock to the pot; bring to a boil and then turn the heat to low/med-low, cover and simmer until squash and apples are soft (about 20 minutes).

Turn off the heat and use a stick blender to blend the soup in the pot (or carefully transfer small amounts to a blender and blend, returning to a large bowl or pot.) Add cream and stir. Adjust the thickness as desired by adding 1/4 cup more of broth at a time. Salt and pepper to taste. Makes about six dinner servings, more as a first course.

Curried butternut squash and apple soup

Enjoy!

November 26, 2012

Don't Throw Out Those Cute Little Pumpkins!

Was your Thanksgiving table decorated with pretty little orange pumpkins this year? Have you had a small collection of squash welcoming visitors on your front porch since Halloween? Are you done with them now? Wait! Don't throw them away! You can eat those things, you know.

Walking through the neighborhood, I keep seeing groups of small pumpkins sitting in the gutter or perched on top of leaf piles in the street, waiting to be picked up by Davis Waste Removal and taken to the landfill. I'm not talking moldy, old carved jack-o-lanterns here, but whole, unblemished and still perfectly good fruit that in many cases would make a tasty pumpkin pie (or two or three).

Good pumpkins in a leaf pile

Those big pumpkins we all buy for carving at the end of October aren't the best for eating (except maybe for the seeds), but the small sugar pumpkin varieties are grown for just that. Their flesh has a light, flaky texture perfect for turning into dessert, as opposed to the stringy insides of a large carving pumpkin. There's a good chance those 1 to 3 pound little pumpkins you bought to set on the mantel this month are good eatin'.

Pumpkins will stay fresh for at least a month and up to two depending on storage conditions. Ones that have been sitting on a shaded porch out of the rain and in the mild temperatures we've been having are probably fine. I just pulled two off our porch last night and baked them in preparation for some pie making.

Lil' Pump-ke-mon Hybrid (l) and Sugar Pumpkin (r)

With pumpkins this small, I remove the skin like I would do with an orange. Slice off the top and bottom, stand the squash back up on the now-flat bottom, and then take off the skin by curving your knife down the sides of the pumpkin the same way you would cut the peel off an orange. Then cut the pumpkin in half, remove the seeds and pulp, and cube.

Cubes of fresh pumpkin

For a side dish, I prefer nearly-dry roasting because it browns and carmelizes the cubes and brings out the sugar. For baking (including freezing for use later in pies) I prefer to spread the cubes in a single layer in a baking dish, add a 1/4 inch of water to the bottom of the dish, and cover. 15-30 minutes in a 400 degree oven will do the trick, with larger chunks taking more time. When they're done, just cool, mash and use or freeze.

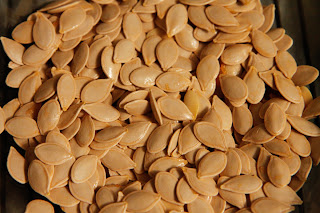
Of course some people think the best part of the pumpkin is the seeds, and my sugar pumpkins had loads of them. Some of what I baked yesterday I had just pulled off the vine, and I couldn't believe how easy it was to extract the seeds. None of that sticky, slimy mess you get when trying to remove seeds from a carving pumpkin. I'm not sure if it was the variety or the fact that I had just clipped it from the plant, but separating those seeds was a breeze and they were very clean. To roast them, toss with a small amount of oil, salt to your liking, spread in a single layer on a baking sheet, and put in a 250 degree oven for 1 to 1 1/2 hours.

Seeds from sugar pumpkins, before roasting

So go rescue your cute, little pumpkins right now! With a bit of work you can have a pumpkin pie on the counter and some crunchy, tasty and healthy snacks for the lunch box.

November 5, 2012

November Harvest & Garden Tasks

One month ago we put down our garden tools for a day and headed over to Guinda for the annual Hoes Down fest, but the very next day and every day since, that hoe (and all the other garden tools) has been back in use and it definitely does not feel like the work season is over on our Central Valley mini-farm.

Pomegranate on the tree

Of all the current garden tasks, harvesting is creating the heaviest load. The particular combination of fruits and veggies on our homestead means we are now in full harvest and processing mode, more so than in September or October. This is mostly due to our large pomegranate tree. So far Mr. English has harvested a little over half the pomegranates from the tree and already we have three burlap sacks full of fruit in the garage, not including the crate I already dealt with.

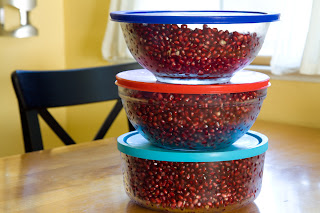
If you love pomegranates, you know about the painstakingly delicate process involved in extracting the seeds without crushing them. I have a system I like, but it still takes one person about one hour to pull all the seeds from six large pomegranates. Do the math on several hundred pieces of fruit and you begin to see what a task I still have ahead of me if I want to process all of it. This is why we give away lots of pomegranates this time of year (let me know if you'd like any!)

Pomegranate seed pockets

About 4 hours worth of seeding

In addition to the pomegranates, we're also happily dealing with about 50 pounds of English walnuts. Mr. English's father owns a walnut orchard up near Chico, so every fall we gratefully receive the gift of enough walnuts to get us through a year's worth of baking and cooking. Of course, the nuts arrive in the shell, still needing to be cured, shelled and frozen. A Davebilt #43 cracker would get the job done in about an hour, but at $150, that's not a justifiable expense when we only crack one 50-lb bag per year. So, instead we use the one-at-a-time nutcracker, and it takes one person about 45 minutes to create a pound of shelled nuts. This is when it helps to get the whole family (and friends) involved.

English walnuts

With the gorgeous weather we've been having, we're also still harvesting and processing lots of eggplant and peppers, and even basil. Most of the winter squash is still on the vines and will need to be pulled, cured and stored before the first frost arrives, probably later this month. In addition to the harvesting, I'm also ripping out summer plants as they finish up and amending the soil before cover cropping or planting with winter crops like garlic, onions, peas and greens of all kinds. That will mean another trip out to the horse barn on the outskirts of town to get another free load of aged horse manure, probably this week before it starts to rain. Those forecast showers are probably the first break I'll get in the garden!

If it sounds like I'm complaining, I'm not. I love the harvest season, it's just that since ours comes a tad later around here, it means we are still in full swing and will be for a few weeks, when others have been winding down for the last month. Not everybody is winding down, though. Just yesterday we joined about 40 other people at Frate Sole olive orchard to pick olives for another Foods Resource Bank fundraiser. We picked about 500 pounds of olives in an afternoon, but most of the trees there are still loaded with fruit and they will be harvesting for a number of weeks to come. So, we are in good company.

What are you still working on in your garden this month? Any relief in sight?

October 24, 2012

Planting Susanville Garlic

It's garlic planting time in Davis! October is the month to get your garlic in the ground around here, and now that the first rains have come, you can take advantage of the softer soil and plant your cloves with ease. Actually, around here you can plant garlic anytime between now and February, but I'm guessing you'll get larger cloves the longer the seed clove is in the ground developing roots prior to new leaves emerging.

"Susanville" seed garlic

I start with high-quality garlic from my favorite seed house, Territorial Seed, and usually plant one softneck variety (more cloves, good for braiding, milder flavor and great for storage) and one hardneck variety (fewer cloves form a single circle around a woody stem; wider range and quality of flavors, but slightly shorter storage time). In the past I've had success with the softneck Susanville, which is a variation on California Early, and the hardneck Duganski. Of course you can get your garlic anywhere, but last year when I tried a cheaper source I had problems. Maybe I would have had problems anyway, but this year I'm going back to my old standby source.

Planting a garlic clove

Clove ready for about 2 inches of soil to go back over it

Garlic likes loose and relatively fast-draining soil with plenty of nutrients (what doesn't??) and I've had good luck growing mine in raised beds. Pull apart the cloves from a bulb of garlic right before you're going to plant them (no peeling necessary), and plant in rows 12-18 inches apart, cloves placed about 4-6 inches apart. Plant them with the tip up and cover with about 1-2 inches of soil.

Once all the cloves are tucked into the soil, cover the bed with a layer of straw to protect the soil and keep the cloves cozy. You don't need to worry about smothering the garlic--it will emerge just fine in the early spring right through the layers of straw--but you can help by pulling apart the straw a bit as you lay it down.

Putting straw on the finished bed

Pulling apart the straw

Because neat, tight dry layers of straw fly like frisbees right off raised beds during windy weather, I also lay a few pieces of wood across the finished beds when the straw is fresh. Experience has taught me that, until the rains come in earnest and weigh down the straw a bit more, the wood will keep it from disappearing during a windstorm and save me the work of collecting it off the paths and re-covering the beds.

Protecting the straw from windy weather

Garlic is relatively easy to grow, but if you want more information, I'd recommend the book Growing Great Garlic, by Ron Engeland. Unless you're really into garlic, it has more information than you'll need (a history of garlic, for example), but it also has very practical information about timing of late season watering and harvest, whether and why to remove garlic scapes, problems you may encounter and what to do about them, etc.

Hopefully come next summer, you'll end up with a basket-o-garlic like this!

October 12, 2012

Got it Covered

After adding a few new raised beds this spring, we're up to about 20 or 25 distinct food planting areas on the homestead and I'm looking at all of them thinking there is no way I have the energy to fill them all with winter or early spring crops. What to do with the areas that won't be in vegetable production over the next few months? I have two choices as I see it. I can amend the soil, cover the beds with thick layer of straw, and just let them rest until March. Cozying up with a soft, thick blanket sounds kind of nice to me right now!

The other choice is to seed the otherwise dormant extra beds with a cover crop, something I've never tried until this fall. Cover crops--also referred to as green manure--reduce soil erosion during the rainy season by keeping bare soil covered with a carpet of green. Most also fix nitrogen in the soil, and my soil always needs more of that. If you cut and turn them under (usually right before they flower), all that nitrogen and green matter goes right into the ground to increase the levels of nutrients and organic matter in the soil. Many cover crops also attract beneficials to the garden. All in all, sounds like a great option.

Cover crop in a raised bed

While I have already covered a few of my beds with straw this fall, I also decided to try cover cropping some beds with Crimson Clover, which is winter hardy and can be planted in the fall around here. (Crimson Clover does have red flowers, but is NOT the same as Red Clover, which spreads by runner.) I bought a 1 lb bag from Territorial Seed Co. along with my seed garlic, but there are lots of options online and you can probably find some at either Higby's in Dixon, one of the other area feed stores, or maybe even Davis Lumber, Redwood Barn or other local nurseries. If you want to try something other than Crimson Clover, use the comparison chart (PDF) on Johnny's Selected Seeds website to learn about the benefits of other types of cover crops.

Germination was slightly erratic without rain

One thing I've learned about planting Crimson Clover in our area is that germination requires very moist soil, and of course we don't have that yet unless we are using hose water. The crop in the photo above was planted about 5 weeks ago, and since we haven't had any rain, I've had to water that bed regularly to get all the clover to sprout. Next time, I'll wait to spread the seed until right before there's rain in the forecast. That way, no hose water is wasted where rain could do the job instead. It will be a bit of an experiment (what isn't in the garden??), but I think October-planted clover will do just fine. Now we just need that rain!

Are you putting your beds to bed for the winter, or are you growing veggies over the cold months?

October 5, 2012

Save a Gallon, Save $4.50

When gas prices jump 20 cents in one day as they did yesterday, and the average price of a gallon of regular unleaded in California hits $4.50, I'm really glad my car looks like this:

Photo courtesy

We've been a one-car family since I stopped working in the classroom 2 1/2 years ago, which means Mr. English gets the car (except on the days he bikes home from Vacaville), and my primary mode of transportation is a Specialized Globe Haul bike. I absolutely love this bike, and in general love relying on a bike to get around town. It's easy when you live in Davis, where it's flat as a pancake except for the freeway and train track overcrossings.

There are two major benefits to using a bike instead of a car every day: getting more exercise, and spending less money. Even if you leave gas out of the equation, it's expensive to buy and own a car. When you consider the cost of a car payment, gas, insurance, parking, and maintenance/repair, I figure we save at least $400 per month by not having a second car. Four hundred bucks times 28 months of not owning a car means I've saved over $11,000. That's huge, and is one reason I can afford to work here on the homestead rather than full-time outside the home. The cost of the bike (plus accessories such as paniers, a front basket and rain pants) wasn't much more than one month's worth of car expenses, and Mr. English does the maintenance himself.

The other big, obvious benefit to having a bike instead of a car is increased physical fitness. When there's a car in the driveway, it's easy to get lazy and choose to drive the 8 mile roundtrip to the dentist. No car in the driveway means I had no choice earlier this week when it was time for my appointment, and I took care of my teeth and my body at the same time.

Even though I already know how much better bike riding is for my health and pocketbook (not to mention the environment), I've found I'm even more motivated to ride when I track my miles and money saved, and there's a great way to do that at the Save-a-Gallon website. The site was created by a couple of Davis guys in 2008 as a way to find out exactly how much of a difference they were making by regularly riding their bikes instead of driving a car.


You can create a Save-a-Gallon account for free and then use it to log your cycling miles. If you enter the current price of gasoline, Save-a-Gallon will tell you how much money you save each time you ride. For example, I know that I saved $1.27 in gas costs by riding to the dentist office instead of taking the gas guzzler, and another $0.75 riding Charlie to his clay class. If you are really dedicated about logging your miles, as time goes by you'll get all kinds of great data about your cycling habits and savings. For example, the graphic below gives me a quick visual on how many miles I logged all total in 2010 and 2011, and how the fall months compared in those two years. The more consistent you are about logging (and I wasn't great, actually), the more helpful the graphs and statistics are.


The weather we're having right now is absolutely perfect for riding your bike. Why not commit to replacing some (or some more) of your regular car trips this month with cycling or walking instead? It'll feel great, I promise!

October 3, 2012

A Tale of Two Cabbages

Cabbage #1, protected from the miserable cabbage butterfly with an upside down soil sifter, and therefore lovely and unblemished:

Beautiful, blemish-free cabbage plant

Cabbage #2, not protected and therefore partially devoured by the miserable cabbage butterfly's offspring:

Cabbage that provided lunch for the caterpillars

As you can see, my method of hand-picking cabbage butterfly caterpillars off my cole crops and swiping eggs off the leaves doesn't work so well when I take a day or two off from the hunt. I did finally get one of the offending butterflies to stop moving for more than a split second, though, so I have some nice closeups for you.

Cabbage butterfly (Pieris rapae)

Cabbage butterfly on a squash plant

I am on my way to outsmarting these little devils, though. Last month, Mr. English made me a frame wrapped with floating row cover material that fits perfectly over my seeding trays. That will at least prevent the butterflies from accessing my seedlings. 

Floating row cover frame fits over seedling trays

The next step will be outfitting a couple of our 4 x 8 foot raised beds with PVC hoops, so I can clip floating row cover over an entire bed. This year, I made the mistake of planting the broccoli and cabbage in a triangular bed, which is not a good shape for making a row cover frame. I tried draping the row cover directly over the plants, but that didn't work well. I had apparently missed a few eggs before I draped the transplants; the eggs hatched, and since I couldn't easily monitor the plants under the row cover, the caterpillars munched away quite a bit before I lifted the fabric and discovered the damage. Grrrrr! Next year my transplants will go directly from a protected seedling flat to a 4 x 8 bed protected with a hoop frame. Maybe this is just a bad year for the cabbage butterfly, but I don't see any other way to successfully grow cole crops around here.

Now that I've honed my cabbage butterfly hunting skills, maybe I can put them to good use and turn this situation to my advantage after all. For over thirty years, Art Shapiro, a biology professor and butterfly expert at UC Davis, has offered a pitcher of beer to the person bringing in the first Cabbage White butterfly of the year in the Davis-Sacramento area. I think he's won the prize himself every year, actually, so the odds are against me, but I will definitely be on the look out come January!

October 1, 2012

Double Digging

"Do you double dig your garden beds?" That's a question I've been asked more than once since I started working full time on the homestead and growing most of the family's vegetables. To be honest, I hadn't even heard the term "double digging" until last year, and I didn't know it involved using a very particular method until I read John Jeavon's book How to Grow More Vegetables...

Practitioners of the French biointensive method swear by double digging as a way of aerating and improving the soil and growing more and better quality vegetables than you ever imagined. But I had also read about local farmers pioneering no-till methods as a way to farm more sustainably, and read a soil food web book that advocated not disturbing the soil at all. So which is it--dig up the soil to a depth of 24 inches, or don't till?

Turns out the answer isn't quite so simple. The process of so-called double digging involves digging and removing only about 12 inches and then loosening (not digging and turning) another 12 inches. Plus, one is supposed to carefully move shovels full of soil from one trench to the next as one is digging, with the goal of disturbing the soil layers as little as possible. That's easier said than done, but there is definitely more to the method than sloppily moving soil around. Ideally, a garden bed will need to be double dug only once or twice and then can be left largely undisturbed, with additions of compost to the top of the bed providing the nutrients needed to maintain the bed in the long run.

A couple of weeks ago I wrote that one of the major lessons learned in my garden this year was that I need to take better care of my soil. After reading more about this particular technique and hearing from people who have used the double digging method with success, I decided to double dig some of my older garden beds once in order to loosen highly compacted soils. After double digging once, I'm going with a long-term plan of improving the soil through compost and green manures, but not more deep digging.

There are lots of books and websites that give more information and specific instructions on how to double dig (just Google the term), but here's what it looked like in one of my raised beds:

About halfway finished

Trench emptied of top 10-12 inches of soil

Loosening bottom 10-12 inches of soil

I moved across the bed digging and loosening one approximately 12-inch wide trench at a time, adding and incorporating soil amendments (homemade compost and purchased "humus") to the bottom of each trench as I went. If you're wondering if this took forever, yes, it took about 2 1/2 hours to do just one bed. Also, I was pretty tired afterwards! Given the amount of effort involved, I've decided to double dig only a few beds this fall and then monitor the results. If it turns out to be worthwhile (i.e. the double dug beds turn out to be super productive and healthy) then I will do more of them next year. Stay tuned for the results!

September 26, 2012

Three Confidence-Building Veggies for Central Valley Gardeners

There are a few veggies in my garden that do well every single year no matter what, and always make me feel like a successful gardener regardless of what the rest of the homestead looks like. It's hard to go wrong with them, and they do a lot to boost my confidence at times when other veggies are letting me down (I'm looking at you, tomatoes!) Here are my favorite sure bets for a Davis summer vegetable patch:

1) Armenian Cucumbers

These guys produce and produce...and keep on producing huge, tasty cucumbers all summer long without fail. These cukes form the basis of my go-to summer meal, the Greek chop chop salad.

Armenian Cucumber

People joke about giving away zucchini, but in my yard it's the Armenian cukes I'm constantly distributing around the cul-de-sac. Lucky for me, I have a neighbor who absolutely loves them and will always take the excess! I've grown Armenian cucumbers for at least the last four years, and they've never let me down. Always prolific, never bitter, and not fussy. All you have to do is keep the ground moist for them. Even if the leaves start to show signs of cucumber plant diseases, like mosaic virus, the cukes keep coming. In fact, if you don't stay on top of it, you'll be overwhelmed by the amount of food produced by just one plant.

2) Cherry Tomatoes

If you want to know the thrill of growing an abundance of your own tomatoes, plant a cherry tomato. Even in a bad tomato year, I can always count on the cherry plants to deliver loads and loads of fruit all summer long. They are the first tomatoes to ripen in the garden and they continue to hang on practically until the first frost.

Ever dependable cherry tomato

My plants consistently grow 8-10 feet tall, even in soils that haven't been amended very well. If I end up with too much fruit--not likely given the many different ways cherry tomatoes can be eaten--it goes to the chickens, who go absolutely mad for cherry tomatoes. I like to spoil my chickens, so this year I grew an extra plant just for them.

3) Basil

Plant basil early (April or May) to give it a chance to get established before the worst of the summer heat, and you'll have basil all season long. Put it in a spot where it'll get a little bit of filtered shade in the hot afternoons, or make your own basil shade structure to give it a break from the scorching sun. I'm sure on the coast or in the Pacific Northwest basil does just fine in full sun, but here in the Central Valley, it appreciates a break. Not many pests will bother my basil plants, except for the occasional batch of whiteflies which are easily removed with a spray of water in the morning. Clip sprigs of basil as you need it in the kitchen rather than harvesting the whole plant all at once; the plants will keep growing and giving you pesto ingredients until the cold weather kills them in the fall.

Basil

None of these veggies are super fussy about soil nutrients and will still produce even if you've accidentally neglected your soil. If you're feeling frustrated with your gardening results this summer, or if you're just starting out and thinking of putting in a new or bigger garden next season, I strongly encourage you to try out these winners next spring. I've found that in Davis, it's hard to go wrong with them.

What are the confidence boosters in your garden?

September 24, 2012

Mystery Bean Bug

One of the things I've enjoyed about paying closer attention to my garden this year is the wide variety of new bugs I've encountered. It's amazing what you can find when you're really looking. Yesterday I came across this pretty little bug as I watered the green bean bed. The bed is mulched with rice straw and as the water flooded underneath the mulch, this guy came crawling out.

Mystery bug in the bean bed

He was about 1/2 a centimeter long, or half the size of my thumbnail. I wouldn't have noticed him, except that his bright green color stood out starkly against the yellow straw. There were two of them, actually, and I expect I'd find more hanging out under there if I pull back the mulch.

I've never seen anything like this bug in the yard before. At first I thought maybe it was the one causing the little, round holes in my bean pods, but a little bit of research on the What's That Bug? website tells me this might be some kind of treehopper, in the Membracidae family. Treehoppers damage plants by sucking their juices and making slits in bark in order to lay their eggs, not by chewing perfectly round holes out of pods. In any case, a pest.

Treehopper?

My guy looks a lot like a Buffalo Treehopper--pictures here and here--but those seem to have little horns on the top where this guy does not. The Buffalo Treehopper on the UC IPM site doesn't have horns, but looks much darker and also larger. Mine also looks like the one pictured here and labeled Atymna helena, but my guy's "helmet" seems more pronounced.

In spite of the resemblance, two things cause me to seriously question the treehopper idea. For one thing, the one that emerged from my straw mulch didn't hop. He happily climbed onto the stick you see him sitting on in the photos, and just sat there for a picture as long as I kept the stick out of the bright sunlight. Maybe he was just waterlogged and not ready to hop around.

Perhaps more importantly, though, he wasn't in a tree. Treehoppers are supposedly tree-dwelling bugs that feed on trees and don't often descend to the ground. So, I'm still not sure exactly what this is and am going to do a bit more research. Thoughts? Ever seen one in your yard?

September 21, 2012

Death by Dog Urine?

I think one of my Thelma Sanders Sweet Potato Squash plants is dying a slow death by dog urine. I have two of them located on a trellis in the front yard garden, and I suspect that my neighbor's dogs are regularly peeing on the plant closest to the driveway. For one thing, I've actually seen one of the dogs raise its leg in a salute to my trellis. Secondly, when our own dog (who doesn't usually have access to this part of the garden) walks by the corner post of the trellis he wants to stop and pee on it--a sure sign that something's been marked by another dog.

Here's what the plant looks like:

Dog urine overdose?

The one right next to it looks fine and has produced one beautiful looking squash (the other buds were attacked by aphids). The low production could definitely point to a lack of enough fertilizer at planting time and throughout early growth, but why would one plant look fine and be producing fruit, while the one a couple of feet away looks like this? Too much direct nitrogen and/or urea in the form of dog pee is the only explanation I can come up with.

Pale leaves

Thoughts? Does this look like fertilizer burn to you? Or does this look like some other nutrient deficiency I'm not considering (unlikely, since the plant next to it that is not taking a direct hit looks much better.) Any ideas on how to deter dogs other than building a small fence? Of course, I will talk with my neighbor, but that won't help prevent other dogs that happen wander into my garden from depositing a bit of their stuff on the plants. I suppose that's one of the inherent risks of front yard gardening, but yuck!

September 18, 2012

Monsanto Protest in Davis

I awoke early yesterday to the loud whomp, whomp, whomp of an unidentifiable helicopter hovering directly above my house and then circling the neighborhood for about 30 minutes. The last time a copter lingered over our neighborhood, the police were engaged in a standoff with an armed gunman about three streets over. A few years ago, it was a suspect who'd fled on foot and was roaming the neighborhood while being chased by a helicopter spotlight. Since I was about to send my daughter out the door to school on her bike, I called the police non-emergency line to make sure it was nothing dangerous this time.

Turns out it wasn't a police helicopter at all, but KCRA TV's Livecopter 3. KCRA was covering the one-year anniversary Occupy protest at Monsanto Corporation's Davis location about 1/2 a mile from our house, which started at 6 a.m. Given that the early photo on the KCRA website showed exactly seven protesters and no traffic issues whatsoever, the event certainly did not warrant helicopter coverage. (Sorry, but hovering news helicopters are a pet peeve of mine.)

"Biohazard Bob" and "Miss GMO" creations

After taking advantage of the relatively cool morning hours to double dig a raised garden bed, I hopped on my bike and peddled over to check out the protest. It was still going strong at 1pm, with a diverse assembly of about 50 or 60 protesters on the scene. It seemed to be a mix of general Occupy movement folks who may or may not know a lot about Monsanto, and people who were there specifically to protest Monsanto's policies and development of GMO crops, including a crew staffing a Prop 37 information table.

Some were standing at the edge of the sidewalk facing the traffic and holding signs with messages like, "No More Frankenfood". Then there was a contingent of folks standing in front of the company's driveway admiring their chalk sign and passing around some pretty skunky-smelling cigarettes. Finally, there were a handful of people dressed in all black with hats and bandanas covering their faces, either to protect their identity or to prepare for the possibility of being pepper sprayed by authorities.

Monsanto GMO protester

Speaking of authorities, I saw only one Davis Police Department patrol car, parked across the street in the school maintenance yard parking lot, and one private security person standing in front of the entrance to the Monsanto building, which seemed an appropriate response to the peaceful protesters. A couple I talked with said the police officer had walked over and talked with protesters about not blocking the busy bike path, but otherwise there hadn't been much interaction and there were no arrests. At that point, there had been no communication from anyone at Monsanto and the protesters thought Monsanto must have told its employees to stay home.

Chalk drawing in front of the company driveway

I'm not a fan of Monsanto myself and I support the protesters' right to be out there making their voices heard and raising awareness of important food and agricultural issues. Even if you aren't concerned about Monsanto's Roundup and GMO products, you have to question why a company that talks a lot about solving the challenges of world hunger through agricultural technology pays its CEO a $145 million dollar, five-year compensation package. That sure would buy a lot of food for hungry people around the world!!

Formal protests have their place in the political process and I thank those who participate. For me, though, I will continue to protest with my money, my vote and my garden tools. I think many times people don't realize just how much power they have to affect change in seemingly entrenched agricultural systems and food policies, but there are some simple things you can do:

1) Use your wallet. Perhaps the easiest way to protest corporate control of the food supply is to refuse to buy food products invented by mega corporations, made with ingredients you don't recognize, and shipped half way across the country or even the world. So simple! Stick to the perimeter of the grocery store where fresh, organic produce is sold and look for local options where available. Better yet, shop your local farmer's market.

2) Use your voice. Your vote is your voice--use it to express your opinion at the polls when there are opportunities to provide direct input on food and farming issues. (Learn more about Prop 37 here.) Also, pick up the phone and call your representatives to ask their positions on specific bills and tell them how you feel.

3) Use your soil. Plant a garden and opt out of corporate Frankenfood by growing your own fruits and veggies. Start small and expand your garden as you have time and gain knowledge. It's addictive--you'll see! You could even go one step further and start saving your own seeds, or visit the Davis Seed Library and check out some of theirs.

If you're interested in learning more about U.S. food and agricultural policies and the effect of GMO crops on our food supply, I'd recommend the Food Democracy Now! website. Food Democracy Now has been supported by Michael Pollan, Alice Waters, Bill McKibben, Wendell Berry, and Marion Nestle, among others, and describes itself as a "grassroots community dedicated to building a sustainable food system that protects our natural environment, sustains farmers and nourishes families."

For news coverage of yesterday's event, see the Davis Patch article here or the Sacramento Bee article here.

September 13, 2012

It's Harvest Celebration Time!

There are soooooo many harvest-themed events of interest to area gardeners, foodies & homesteaders this fall. It's a busy time, but it's always worthwhile to get out to at least one food-focused celebration if you can.

Hoes Down

Some are free & others require tickets, some are fundraisers for local farms & others are raising money for nonprofits that help get fresh food to area kids, some are in Davis & others are scattered throughout Yolo County and beyond, and all are family friendly. Check out the list and see if there's something that appeals to you! Events are listed in chronological order.

Grain-to-Bread Workshop for Kids at the Farmer's Market, September 15

Eat Real Fest (Oakland, CA), September 21-23

~ Street Food Rodeo at 6th & G in Davis, September 21

Fall Seed Swap, hosted by the Davis Seed Savers Alliance, September 22

~ Autumn Equinox Celebration at Soil Born Farms (Sacramento), September 22

Eat Local Faire & 40th Birthday Bash at the Davis Food Co-op, September 28

Capay Crush 2012 - a Capay Organic/Farm Fresh to You event (Capay, CA), September 29

Crush Festival 2012 - nine wineries at the Old Sugar Mill (Clarksburg, CA), September 29-30

Hoes Down Harvest Festival (Guinda, CA), October 6-7

~ Delta Wine and Art Faire (Clarksburg, CA), October 7

Know of a September or October local, harvest-related event I forgot about? Send me an email and I'll add it to the list.

September 12, 2012

Lesson Learned: It's All About the Soil!

I know..."Well, duh!!", right? Of course raising food is all about the soil! As someone who's been gardening her whole life and who grew up across the street from an esteemed UC Davis soil scientist (Omund Lilleland), I did already know that. But I had forgotten that growing veggies really is ALL about the soil--whatever comes out of the ground is almost secondary, even if it's the main reason you're gardening. As Gene Logsdon says, "I don't know which of those two goals--enriching the soil or raising the food--you consider more important, but it makes little difference. In accomplishing the first goal organically, you achieve the second automatically."

If you start taking your soil for granted or get lazy about soil fertility at all, as I did this spring and summer, you will notice it. If you're like me, after kicking yourself for making such a stupid mistake, you take immediate action to fix it and refocus your attention on the all-important dirt. So, as one of my all-time favorite literary characters, Hermione Granger, would do, the first place I went in order to solve this problem was the good 'ol library. In the last month I've read two great books about soil, both available through the Yolo County Library. The first is the relatively new book Teaming with Microbes: The Organic Gardener's Guide to the Soil Food Web, by Jeff Lowenfels and Wayne Lewis.


Reading this 200-pager, I learned loads about soil structure, the difference between bacterially-dominated and fungally-dominated soils, the bazillions of bacteria and fungi (and other creatures) that inhabit our soils and especially compost, and finally what to do in the garden to encourage beneficial soil life and a healthy soil food web. The book is written in accessible language (i.e. not overly scientific, which is a risk given the subject matter) and is filled with all kinds of fascinating information, like, for example, the fact that earthworms can live to be 15 years old. Who knew?

The second book was Gene Logsdon's The Gardener's Guide to Better Soil, published in 1975 by Rodale Press. This book, too, is a combination of technical information about soil--in this case, a focus on the various types of soil across the country--and practical information on how to manage and build fertile soil. While the first book was fascinating and well worth a read, Logsdon's book is the one I'll buy and put on my own homestead reference shelf. Aside from all the practical info, I like his more opinionated, personal writing style and he has a definite environmentalist bent, which I appreciate. (I also own and love Gene Logsdon's new book Holy Shit: Managing Manure to Save Mankind, but that's another post.)


Both books stress the importance of compost, for all the reasons we already know compost is essential to improving the soil and growing fantastic veggies. The part I didn't know was exactly how much bacterial and fungal life is in homemade compost and how critical it is to inoculate and regularly amend all your garden soil with all that life. (There's a lot less of it in the sterilized, bagged compost you find at the nursery.) I have many compost piles going throughout the yard, so I'm all set there. Both books also devote a chapter to mulching, with Logsdon calling mulch "a kind of minor miracle" and noting all the reasons it's critical in the garden. Again, while I already knew the importance of mulch, I will admit that not all my beds were mulched this season, proving that everybody needs a reminder once in a while.

The one major topic on which these two books disagree is breaking up the soil. Lowenfels and Lewis argue strongly against the practice of disturbing the soil structure through tilling and deep digging, quipping, "Sure, the soil is fluffy after rototilling, but that's a dog's name, not a soil description." Logsdon, on the other hand, suggests cultivating for the purposes of preparing a firm seedbed and controlling weeds, and includes instructions on deep digging by hand or using a rotary tiller in a larger garden. Of course, this book was written almost forty years ago and it's possible his views on tilling may have changed, but there are plenty of other vegetable gardening experts who still recommend the practice of double digging (John Jeavons comes to mind first.)

So, I now have all kinds of new information about managing soil to put into practice on the Banyan's End homestead. I will be paying much closer attention to what the soil is trying to tell me through the vegetables that are growing out of it, and I will report back on the blog as I take steps to increase soil fertility and organic matter content. And finally, a few more words of wisdom from Gene: "We will learn how to take care of our soil...and our soil will take care of us." I am dedicating myself to that learning in earnest, starting right now.

September 10, 2012

The Seasons They Are a-Changin'

First of all, where did the first week of September go?? I guess it got gobbled up by the blur of end-of-summer and start-of-school time, not to mention dealing with the transition from a summer to fall edible garden. Having kids and being teachers ourselves, this is always a busy time of year, both in the garden and in the home.

Developing white mini pumpkin

Mr. English went back to work a few weeks ago already (Vacaville schools start even earlier than Davis), the kids are getting to know their new teachers and classmates, and I'm spending most days outside. Many of the vegetables are in peak production now, causing a mad rush of food preparation and preservation. But it's also a time of transition for the plants. They're getting used to shortening days and cooler nights, in addition to slightly cooler daytime temps. Meanwhile, I'm getting used to the return of homework and the flurry of activity that comes with Back to School--music lessons, dance rehearsals and performances, art classes, Sunday School, etc. Seems as if family activities are ramping up just as the garden is about to wind down.

Of course, that's by design. Agriculture is the reason why kids have historically had long breaks from school, at least in rural areas. Traditionally, kids were available on the family farm during critical planting and harvesting times, and returned to their studies once things quieted down on the farm. Society is not on ag time anymore, at least not in suburban Davis, so our kids go back to school right in the middle of peak harvest and garden work time. That's a bummer for us mini-farmers, who could still really use their help.

Basil waiting to be picked and turned into freezer pesto

September in the garden finds me seeding a host of fall & winter crops (beets, carrots, kale, chard, lettuce, bok choy, spinach), ordering garlic, preparing space for peas and onions, building compost piles all over the place, pulling spent crops and improving the soil in the raised beds, planting cover crops to increase organic matter, and protecting young cabbage and broccoli plants from cabbage butterflies. Whew--no wonder the first week of September went by so quickly! And that's to say nothing of prepping and preserving all the zucchini, tomatoes, cucumbers, basil, beans, and peppers that are filling the harvest baskets daily.

The weather is beautiful and it's a good time to be out and about on the homestead, so I'm not complaining, but it will be nice to have a bit of a break when fall officially arrives later this month and the rush of the harvest is over. Meanwhile, I'm headed back into the kitchen to make some pesto!

August 30, 2012

What's Eating My Cabbage and Broccoli Seedlings?

That's a question I used to ask myself a lot when I first started growing cole crops several years ago. Now I know the answer--the cute but deadly (if you're a broccoli seedling) cabbage butterfly--and yet I still struggle with prevention every year. One of these days, I WILL prevail over the cabbage butterfly!

When you see what can happen to a flat of unprotected cole crops in a matter of just days if you're not paying attention, it's not an exaggeration to call these small, pale yellow-green butterflies killers. They, or rather their well-camouflaged offspring, can decimate a flat of seedlings if you don't take quick action to stop them.

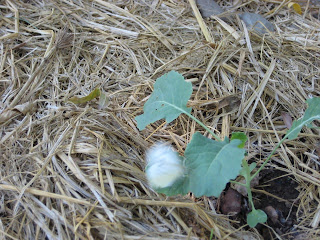
Denuded cabbage & broccoli seedlings

Here's how it works. One day your seedlings look fantastic and you're planning on transplanting them out into the garden soon. You notice a few microscopic holes in the leaves and don't think much of it. Two days later, huge chunks are carved out of the leaves, and some of the leaves are missing altogether. What used to be ready for the ground is now destined for the compost pile. The trick is to understand how this damage happens and act immediately when you notice signs of attack on the seedlings.

The first thing to look for is cabbage butterflies flying around your yard. These are the same little butterflies that get stuck to your windshield and grill in droves if you drive up County Road 102 towards Woodland in the middle of August. These buggers move so quickly, you can hardly catch them sitting still. I honestly don't know how they manage to deposit so many caterpillar eggs on the leaves when they never stop flitting about. Here's an action shot of one visiting my broccoli bed:


If you see the butterflies in your garden, start checking the underside of the leaves of your cole crop seedlings for teeny tiny yellowish egg sacks that stick straight off the surface of the leaf, as in the photo below. (In my experience, they don't go after other types of plants.) Those eggs will quickly hatch into teeny tiny caterpillars that are the exact same color of the leaf and therefore hard to locate once they appear and start chowing down on your plants.

Cabbage butterfly eggs on a broccoli leaf

The eggs are easily removed with a gentle swipe of your finger, but be careful you don't tear the leaf apart as you're scraping off the eggs. Seedlings are tender and easily damaged by gloved hands. If you're diligent about monitoring your seedlings for eggs, you can avoid any damage to the plants in the first place by ridding them of caterpillars before they hatch.

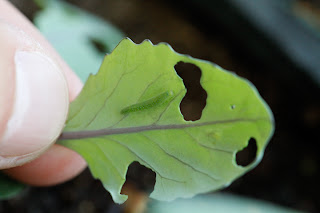
You're bound to miss a few, though, and sometimes there isn't time for individual preventive attention to each seedling. In that case, monitor carefully for holes in the leaves and take action the minute you see them. If there's a little hole, there's a little caterpillar, and both will only get bigger if you do nothing!

Cabbage butterfly worm

Look who's poking his head out through the hole in the leaf!

When I find worms, I like to pick them off the plants by hand and feed them to the chickens (my chickens are goofy and get intimidated by big caterpillars, so they're happy with these mini ones). An alternative would be to buy some Bt (Bacillus thuringiensis), a natural caterpillar-destroying bacteria, but in my experience it's not very effective in a small garden.

That's because when you only have one or two beds of cabbage plants, it takes just as much time to apply Bt as it does to watch for eggs and pick them off. The caterpillars have to ingest the Bt, for one thing, so they may munch a while longer before they die. Because they have to eat Bt, you have to spray it on both the top and underside of every leaf, which can be awkward and time-consuming. Finally, Bt breaks down after about a week, so you have to spray regularly if you want long-term control.

Other options would be to cover the plants with floating row cover (even that is a little heavy for one-week-old seedlings) or another screening material. I've protected seedlings by covering them with an upturned homemade soil sifter.

Soil sifter re-purposed as cabbage butterfly protection

Next season I hope to have more permanent solutions in place for both seedlings in planting trays and starts in the garden beds. I plan to make simple screened boxes that fit over my seed starting trays, and larger ones that use floating row cover on a basic frame made with leftover 1 x 2s. Because my garden beds are uniformly sized, one contraption will fit all of them and can be rotated as needed throughout the garden. For now, a hodge podge of solutions will have to do, plus vigilance in removing those eggs. It will all be worthwhile four months from now when I'm pulling beautiful heads of cabbage and broccoli from the garden!