 |
| (photo courtesy) |
Of course, anybody can compost easily by just tossing garden debris and kitchen scraps in a pile in the backyard and letting the material rot slowly, turning itself into black gold over time. It doesn't have to be complicated. However, if you have more time to spend on your compost projects or want to try some new techniques, you might find something of interest in this book. It's definitely a comprehensive resource and maybe the only one you'd need on compost.
I appreciated the in-depth information about various compost materials (hay, pine needles, cardboard, and odd additions such as dryer lint and fabric) and the chapter on compost gardening techniques. None of the methods are brand new or unique to these authors, but some of them just hadn't occurred to me before reading the book.
For example, the authors strongly encourage readers to build their compost piles directly in the garden, meaning actually on top of a patch of soil where you plan to grow something next season, rather than on the edges of the yard. Most of our compost piles are tucked out of sight and contained in wooden or plastic bins; I hadn't thought to build one right in the garden, but it makes a lot of sense. Some of the best soil in my yard is the stuff that's been building up at the bottom of the compost bins over the years. Why not put that right where I need it in the first place?
Again, this is not a new technique. Some people call it sheet composting, others lasagna gardening; these authors call it "Comforter Compost" and focus on locating it directly in a veggie bed. The method is analogous to laying down a comforter over the top of a bed in your house. It doesn't have to be constantly turned or changed; you just lay it down and it improves the functionality of the existing bed. Comforter Compost doesn't have to begin with a layer of newspapers or cardboard, as sheet composting often does, because the goal is not to smother unwanted plants or grass as you build a new bed, but to improve upon what's already there.
One of the lessons I've learned in the garden this year is that I have to pay waaaaay more attention to maintaining the quality of my soil (more on that later), so I decided to make a Comforter Compost over the bed that held some of my potatoes this spring. This piece of ground had never been improved or amended, and was suitable for the potatoes only because I put them in above-ground containers filled with soil and organic matter from other parts of the yard. Here's what the patch looked like after I dumped out the potato containers:
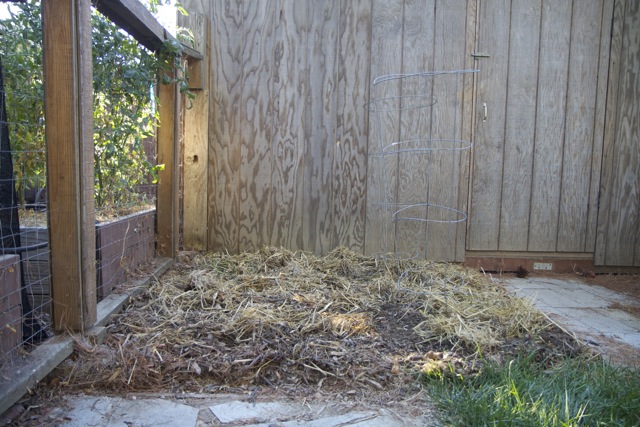 |
| Bed after dumping out potato container contents |
The straw is from the potato towers. I smoothed this straw/soil mix over the space and then added the next layer, which consisted of about an inch of fresh grass clippings from the mower.
 |
| Bed with first compost layer of grass clippings |
Next came a thick layer of leaves gathered from underneath the Sweet Gum trees. This is basic composting stuff here--mixing of browns and greens. Nothing fancy, just brown, green, brown, green. You might notice that two tomato cages are still stuck in the soil on the right side of the bed. Well, that's because they are in fact stuck. As in, no amount of arm muscle strength (from me, at least) was going to dislodge those from the heavy clay-turned cement base of this bed. That right there tells you all you need to know about the quality of this soil!
 |
| Leaf layer |
After the leaves came a layer of aged horse manure (a composting "green" because of the nitrogen levels, even though its color is brown), taken from the pile we got from a neighbor's nephew in the spring and stashed away near the chicken coop for future use. Finally, I topped the Comforter Compost with a hay mulch to help keep the moisture in and improve the look of the bed a bit.
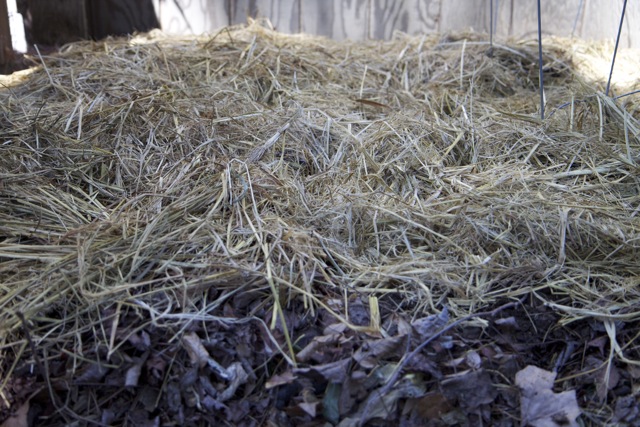 |
| Hay tops the comforter compost |
Now I'll leave this bed alone until spring, with the possible exception of aerating it here and there if I think of it over the next eight months. By April it should be ready for some winter squash seeds, which I imagine will greatly appreciate what at that point should be a bed topped with rich compost. I'll be sure to let readers know how it goes.
Anyone else ever tried composting directly in a planting area of your garden?
No comments:
Post a Comment